Instructor Guide
| Site: | Afghanistan open university |
| Course: | Afghanistan open university |
| Book: | Instructor Guide |
| Printed by: | |
| Date: | Friday, 17 July 2026, 3:12 AM |
Description
This guide helps instructors manage their courses, upload materials, create assignments, and conduct exams in Moodle.
1: Getting Started
Steps to begin your course:- Enter your course page.
- Click on Turn editing on.
- Review the course layout (Weekly or Topic format).
- Make sure your course is ready for content upload.
📌 It is recommended to organize your course before adding materials.
2: Course Structure
Organizing your course:- Divide your course into sections such as:
- Weekly format (Week 1, Week 2, etc.)
- Topic format (Chapter 1, Chapter 2, etc.)
📌 Each section should represent a clear part of your course content.
3: Adding Course Materials
To add materials:1. Click on Add an activity or resource.
2. Choose one of the following:
- File: Upload PDF, Word, or PowerPoint files.
- URL: Add links to videos or external resources.
- Page: Write lecture notes directly.
📌 Always provide clear titles for your materials.
4: Organizing Materials
Recommended structure for each section:- Introduction
- Lecture file
- Video or additional resource
- Practice or exercise
📌 This helps students follow the lesson easily.
5: Assignments
To create an assignment:
- Click Add activity → Assignment
- Enter the title and instructions
- Set the deadline
- Define grading
- Save
📌 Make sure instructions are clear for students.
6: Quizzes (Exams)
To create a quiz:1. Click Add activity → Quiz.
2. Set the time and availability.
3. Add questions.
Question types:
- Multiple choice
- True/False
- Essay
📌 Always review quiz settings before publishing.
7:Gradebook Management Guide
This guide is designed to help instructors and course administrators manage, configure, and review student grades in the IOMAD Gradebook.
Accessing the Gradebook
To access the Gradebook, follow these steps:
- Log in to the system.
- Navigate to My Courses.
- Select the desired course.
- Enable Edit Mode.
- Click on the Grades tab.
You will now enter the Gradebook section.
|
Navigate to My Courses. |
Enable Edit Mode. |
Click on the Grades tab. |
|
|
 |
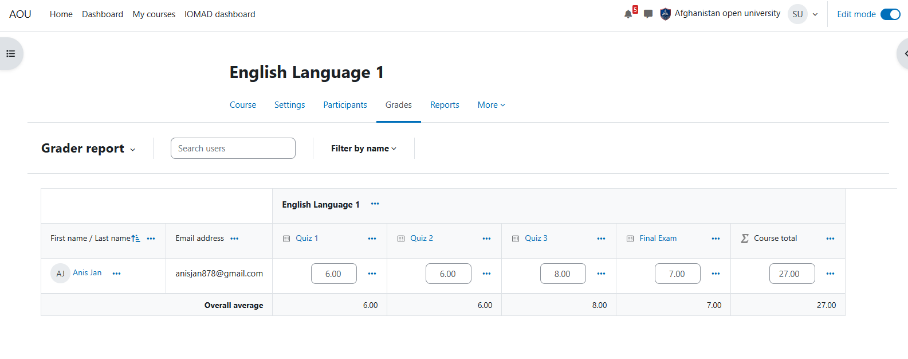 |

Grade Report
The Grader Report allows you to:
- View grades for all students.
- Check each student's overall grade.
- Review grades for individual activities such as:
- Assignments
- Quizzes
- Lessons
|
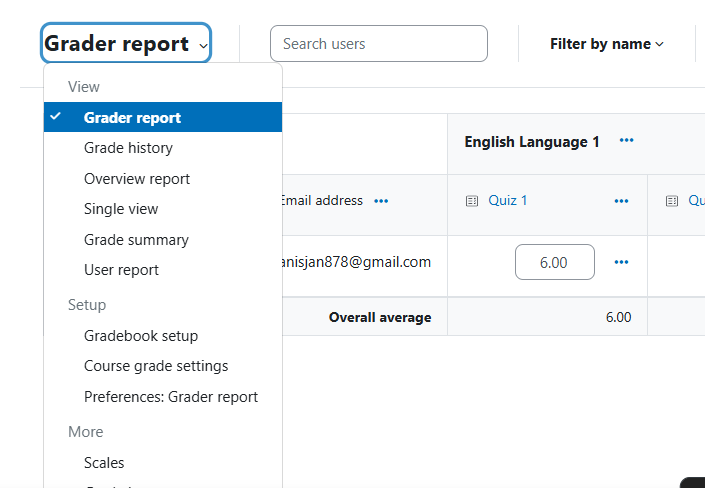
To access the Grade Report:
|
 |
Gradebook Setup
The Gradebook Setup section allows you to:
- Create grade categories.
- Assign weight percentages to categories.
- Configure the grading structure for the course.
Example Grading Structure
| Category | Weight |
|---|---|
| Lessons | 10% |
| Quizzes | 30% |
| Assignments | 60% |
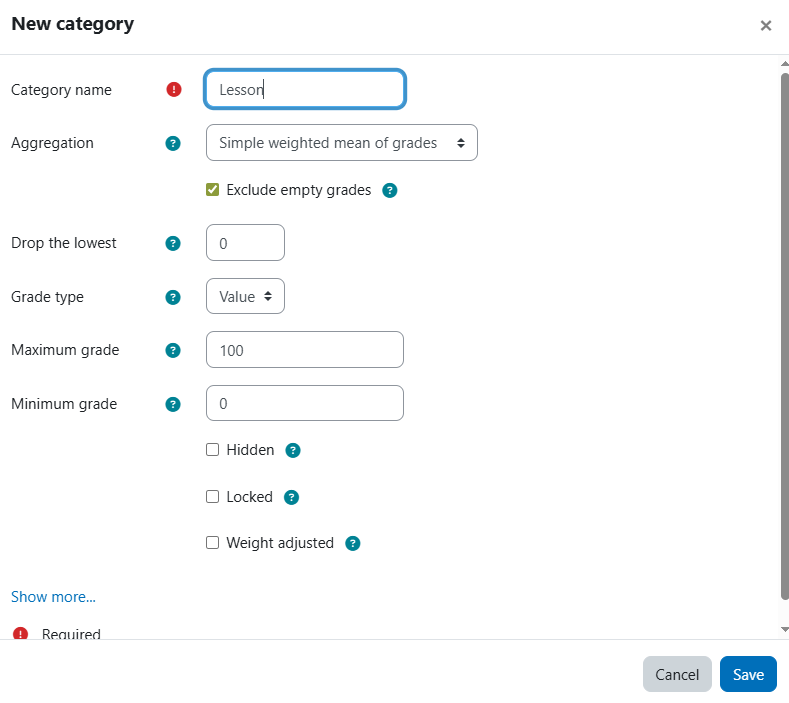
Creating a Category
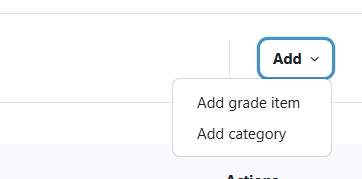
To create a new category:
- Click Add.
- Select Add Category.
- Enter a category name (for example: Lessons).
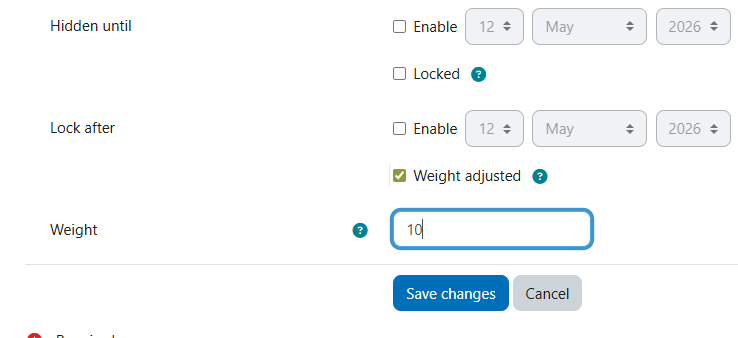
- Click Show More.
- Enable Weight Adjusted.
- Enter the desired percentage in the Weight field (for example: 10).
- Click Save Changes.
Repeat the same process for all required categories.
| Click Add. | Select Add Category. |
|
 |
 |
 |
|
||
 |
||
Assigning Activities to Categories
When creating a new activity or resource, make sure to select the appropriate category. This ensures that grades are calculated correctly according to the grading structure.
Examples:
- Lessons → Lessons Category
- Quizzes → Quizzes Category
- Assignments → Assignments Category
Important Notes
- Ensure that all category weights are configured correctly; otherwise, the final grades may be calculated incorrectly.
- Always click Save Changes after making modifications.
- Verify that all graded activities are assigned to the correct categories.
- Review the Gradebook setup periodically to ensure grading accuracy and consistency.
8: Exams and Gradings
Moodle Course-Level Exam and Grading Documentation
1. Introduction
This document explains how exams and grading work at the course level in Moodle. It covers the procedures for creating exams, configuring grading methods, managing submissions, grading students, and publishing results.
2. Overview of Moodle Exam and Grading System
Moodle provides a complete Learning Management System (LMS) for managing assessments and grades. At the course level, instructors can:
- Create quizzes and exams
- Add assignments and activities
- Configure grading scales and gradebooks
- Evaluate student performance
- Publish grades and feedback
- Track course progress
The grading system in Moodle is centralized through the Gradebook, where all assessments and scores are collected automatically.
3. Types of Assessments in Moodle
Moodle supports different assessment methods:
|
Assessment Type |
Description |
|
Quiz |
Online exams with objective or subjective questions |
|
Assignment |
File uploads, essays, reports, or projects |
|
Forum Grading |
Participation-based grading |
|
Workshop |
Peer assessment activities |
|
Manual Grade Item |
Instructor-entered grades |
|
Attendance |
Attendance-based evaluation |
4. Procedure: Creating an Exam (Quiz)
Step 1: Access the Course
- Log in to Moodle.
- Open the required course.
- Turn on Edit Mode.
Step 2: Add a Quiz Activity
- Click Add an activity or resource.
- Select Quiz.
- Click Add.
Step 3: Configure Quiz Settings
General Settings
- Enter quiz name
- Add description/instructions
Timing Settings
Configure:
- Open date
- Close date
- Time limit
Grade Settings
Configure:
- Number of attempts
- Grading method
- Highest grade
- Average grade
- First attempt
- Last attempt
Layout Settings
- Questions per page
- Navigation method
Question Behavior
- Shuffle questions
- Shuffle answers
- Deferred feedback
- Immediate feedback
Review Options
Control what students can see:
- Marks
- Correct answers
- Feedback
Security Settings
Optional settings:
- Browser security
- Password protection
- IP restrictions
Step 4: Save the Quiz
Click:
- Save and display
Step 5: Add Questions
- Click Edit quiz.
- Select Add question.
- Choose question type.
Common Question Types
|
Question Type |
Description |
|
Multiple Choice |
Single or multiple answers |
|
True/False |
Binary answer |
|
Short Answer |
Text-based response |
|
Essay |
Long written answer |
|
Matching |
Match items |
|
Numerical |
Numeric answers |
Step 6: Set Marks
For each question:
- Assign marks
- Define correct answers
- Configure penalties if applicable
Moodle automatically calculates the total quiz score.
5. Exam Attempt Process for Students
Student Workflow
- Student logs into Moodle.
- Opens the course.
- Clicks the quiz/exam.
- Starts attempt.
- Answers questions.
- Submits exam.
Auto-Save Feature
Moodle automatically saves responses during the attempt.
Submission Confirmation
Students receive:
- Submission confirmation message
- Attempt summary
6. Automatic Grading in Moodle
Auto-Graded Questions
The following question types are graded automatically:
- Multiple Choice
- True/False
- Matching
- Numerical
- Short Answer
Process
- Student submits quiz.
- Moodle checks answers.
- Scores are calculated instantly.
- Grades are transferred to Gradebook.
7. Manual Grading Process
Questions Requiring Manual Grading
- Essay questions
- File uploads
- Long text assignments
Procedure
- Open quiz.
- Select Results.
- Open Manual grading.
- Review student responses.
- Enter marks and feedback.
- Save grades.
8. Assignment Grading Procedure
Step 1: Create Assignment
- Add activity/resource.
- Select Assignment.
- Configure settings.
Important Settings
- Submission type
- Due date
- Maximum file size
- Allowed file types
- Grade type
- Maximum grade
Step 2: Student Submission
Students:
- Upload files
- Submit online text
- Confirm submission
Step 3: Grade Submissions
- Open assignment.
- Click View all submissions.
- Open student submission.
- Review files.
- Enter:
- Grade
- Feedback comments
- Save changes.
9. Moodle Gradebook System
Purpose of Gradebook
The Gradebook stores all student grades for the course.
It supports:
- Automatic grade calculations
- Weighted grading
- Category-based grading
- Final grade computation
Accessing Gradebook
- Open course.
- Navigate to:
- Grades
Gradebook Features
|
Feature |
Description |
|
Grade Categories |
Organize assessments |
|
Aggregation Methods |
Calculate totals |
|
Weighting |
Assign percentage weight |
|
Grade History |
Track grade changes |
|
Export Grades |
Download grades in Excel/CSV |
10. Grading Methods in Moodle
Common Aggregation Methods
Natural
Automatically sums grades.
Weighted Mean
Calculates grades based on percentages.
Example:
|
Component |
Weight |
|
Assignments |
30% |
|
Midterm Exam |
30% |
|
Final Exam |
40% |
Simple Weighted Mean
Weights grades according to maximum marks.
Highest Grade
Uses highest score among attempts.
11. Final Grade Calculation
Example Calculation
|
Assessment |
Marks Obtained |
Weight |
|
Assignment |
80/100 |
30% |
|
Midterm |
70/100 |
30% |
|
Final Exam |
90/100 |
40% |
Final Grade Formula
Final Grade =
(80 × 0.30) + (70 × 0.30) + (90 × 0.40)
= 24 + 21 + 36
= 81%
12. Feedback and Result Publishing
Instructor Actions
Instructors can:
- Release grades immediately
- Hide grades until review is complete
- Add personalized feedback
- Publish answer review
Student View
Students can:
- View grades
- Read feedback
- Review attempts (if enabled)
13. Exam Security Features
Moodle supports several security measures:
|
Feature |
Purpose |
|
Time Limit |
Restrict exam duration |
|
Question Shuffle |
Reduce cheating |
|
Browser Security |
Prevent navigation |
|
Password Protection |
Secure exam access |
|
IP Restriction |
Limit access locations |
|
Safe Exam Browser |
Lock down environment |
14. Reports and Analytics
Moodle provides detailed reports for instructors.
Available Reports
|
Report Type |
Description |
|
Quiz Statistics |
Question performance |
|
Attempt Report |
Student attempts |
|
Grade Report |
Overall grades |
|
Activity Completion |
Course progress |
|
Logs |
User activity tracking |
15. Best Practices
For Exams
- Use question banks
- Shuffle questions and answers
- Set clear instructions
- Test quizzes before publishing
- Configure proper time limits
For Grading
- Use grading rubrics
- Provide feedback promptly
- Verify gradebook settings
- Use grade categories properly
16. Common Workflow Summary
Instructor Workflow
- Create course activities
- Configure grading settings
- Publish exam/assignment
- Monitor submissions
- Grade responses
- Release grades
- Generate reports
Student Workflow
- Access course
- Attempt assessments
- Submit responses
- Receive grades and feedback
17. Conclusion
Moodle provides a powerful and flexible course-level exam and grading system that supports both automated and manual assessments. Through quizzes, assignments, and the Gradebook, instructors can efficiently manage student evaluations, calculate final grades, and provide feedback. The system also includes security, reporting, and analytics features that improve the overall assessment process.
9: Self-Paced Courses
Design of a Self-Paced Sequential Course in Moodle
1. Introduction
This document provides a detailed explanation of the design and implementation of a self-paced course within the Moodle Learning Management System. In this course structure, access to each learning unit is conditional upon the successful completion of the preceding unit. The primary objective of this design is to enforce a structured learning pathway and ensure that learners meet all prerequisite requirements before progressing.
2. Enabling Completion Tracking
2.1 Description
Completion Tracking is a core Moodle feature that allows monitoring of learner progress throughout a course.
2.2 Implementation Steps
- Navigate to Course Settings
- Enable the option:
- Completion Tracking = Yes (Enabled)
2.3 Outcome
Once enabled, Moodle records the completion status of each activity, which can then be used to control access to subsequent content.
3. Defining Activity Completion Criteria
3.1 Description
Each activity within the course is configured with specific criteria that determine when it is considered “completed.”
3.2 Implementation Steps
For each activity:
- Open Activity Settings
- Configure the Activity Completion section
3.3 Types of Completion Criteria
- Manual Completion: Learners manually mark the activity as complete
- Automatic Completion, based on predefined conditions:
- Activity viewed
- Grade received
- Minimum passing grade achieved
3.4 Example
For a Quiz activity:
- Completion condition: Achieve a minimum score of 60%
4. Applying Access Restrictions (Restrict Access)
4.1 Description
Access to subsequent activities or sections is restricted based on the completion of prior activities.
4.2 Implementation Steps
- Open settings for the target activity or section
- Locate the Restrict Access section
- Add a restriction:
- Activity Completion of the prerequisite activity
4.3 Outcome
Each activity or section becomes accessible only after the defined completion conditions of the previous activity are met.
5. Designing a Sequential Learning Path
5.1 Description
The course is structured as a linear sequence where each step depends on the completion of the previous one.
5.2 Implementation Structure
- Section 1: Unrestricted (always available)
- Section 2: Available after completion of Section 1
- Section 3: Available after completion of Section 2
- Continued in the same pattern
5.3 Outcome
This structure enforces a step-by-step progression, preventing learners from skipping ahead and ensuring logical knowledge acquisition.
6. Using Grade-Based Restrictions
6.1 Description
In addition to completion status, minimum grade thresholds may be used as access conditions.
6.2 Implementation Steps
- In Restrict Access, add:
- Grade Condition
6.3 Example
- Learners can access the next section only if they achieve at least 70% in the previous quiz
7. Managing Visibility of Restricted Activities
7.1 Description
The display behavior of restricted activities is configured to enhance user experience.
7.2 Available Options
- Completely hide restricted activities
- Display activities with restriction conditions shown
7.3 Outcome
Displaying restriction conditions informs learners about upcoming content and the requirements needed to unlock it.
8. Testing and Validation
8.1 Description
The course configuration is tested to ensure correct functionality of all conditions and restrictions.
8.2 Implementation Steps
- Log in using a Student role
- Verify:
- Proper enforcement of restrictions
- Sequential unlocking of activities
- Accurate tracking of completion and grades
8.3 Outcome
Validation confirms that the learning path behaves as intended and all conditional logic is functioning correctly.
9. Conclusion
By utilizing the following Moodle features:
- Completion Tracking
- Activity Completion
- Restrict Access
a structured and controlled learning environment has been successfully implemented. This approach:
- Ensures prerequisite fulfilment
- Guides learners through a logical progression
- Enhances the overall effectiveness of the learning experience
10: Adding multilingual content in model
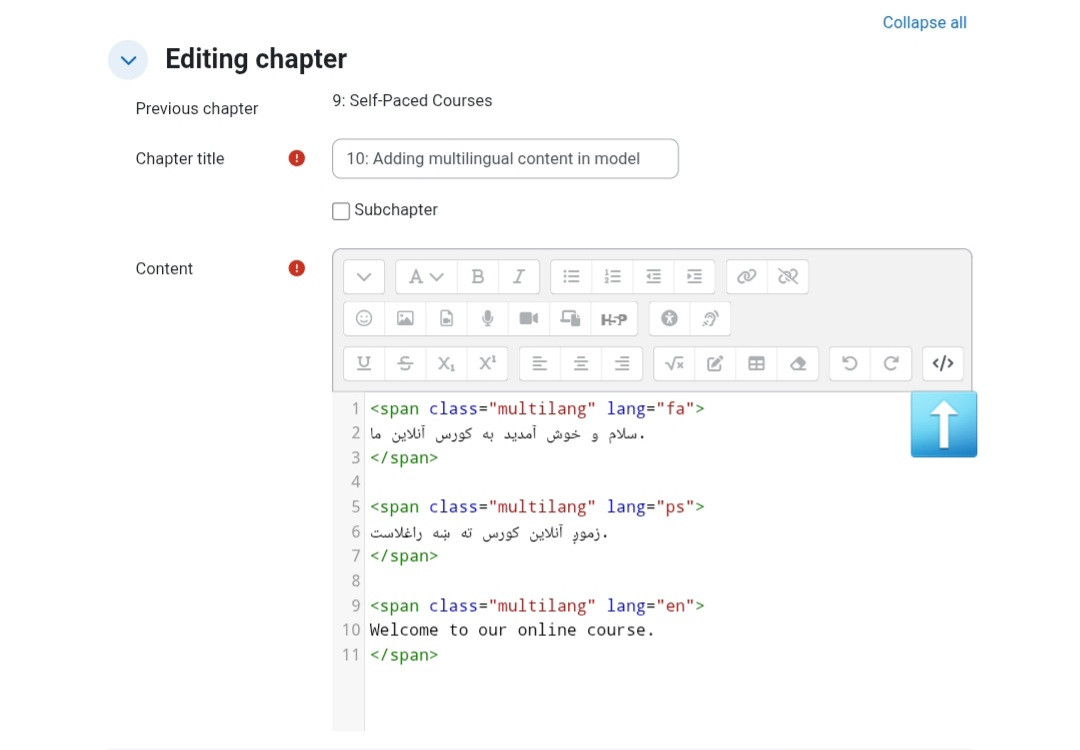
To add content in three languages (Dari, Pashto, and English) in Moodle, use the </> (HTML) option in the text editor when creating or editing content.Then add your text using multilang tags for each language:
- lang="fa" for Dari
- lang="ps" for Pashto
- lang="en" for English
After saving, Moodle will automatically display the appropriate text based on the user's selected language.
📌 Always make sure each language text is placed inside its correct language tag.
📌 Example image / نمونه تصویری: